NextJS: Tips For Building a Statically-Generated Site
Statically generated SPAs offer several advantages to public-facing sites that display relatively static content:
- Built-in SEO: Since all the HTML is pre-generated, search engines have an easy time indexing the content.
- Load Performance: There's no need to hit any backend services at request time, greatly reducing server-side latency
- Same Rich SPA Experience: End-users still see pages refresh without a round-trip to the server after the initial load.
- Easy Deployments: Since we're just dealing with static files (HTML/JS/CSS/images), we can easily deploy the site to a CDN like AWS S3+Cloudfront.
NextJS is a great framework for building statically rendered or dynamically server-rendered applications with React.
Disclaimer: I cannot compare NextJS to other similar frameworks, like GatsbyJS. But, I've found NextJS to be a very complete and easy-to-use framework.
While the documentation for NextJS is top-notch, I'm putting together this guide to help fill in some gaps I encountered when developing using the latest version of the framework. So, here it is:
Learn NextJS Thoroughly!
Before doing anything, run through the initial tutorial. The tutorial covers all the core concepts, including when to choose between static rendering, dynamic server-side rendering, or dynamic client-side rendering.
Deploying to AWS (S3 + Cloudfront)
Deploying NextJS apps to CDNs like Netlify or Vercel is fairly easy. However, deploying to AWS was slightly more painful, because of its lower-level nature.
Below is some guidance we gained from our experience with deploying NextJS to CF+S3:
- Follow this article to get started with setting up the s3 site bucket and manually uploading the statically generated site.
-
Then, follow this tutorial for setting up Cloudfront, linking S3 to Cloudfront, automating your deployment to AWS with npm scripts, and setting up a domain with Route53. Whew! It's a lot. While this tutorial is not specifically for a NextJS site, it does apply to any plain old React site.
When you get to the section where you add this npm script:
change it toaws s3 sync build/ s3://YOUR_S3_DEPLOY_BUCKET_NAME
since NextJS exports its final rendered files to a directory namedaws s3 sync out/ s3://YOUR_S3_DEPLOY_BUCKET_NAMEout/Combining the steps for both tutorials, your final set of build & deploy scripts should look something like this in your
package.json:"scripts": { "dev": "next dev", "build": "next build && next export", "predeploy": "CI=true npm run build", "deploy": "aws s3 sync out/ s3://YOUR_S3_DEPLOY_BUCKET_NAME --delete", "postdeploy": "aws cloudfront create-invalidation --distribution-id YOUR_CF_DISTRIBUTION_NAME --paths '/*'" }, -
Once you are fully deployed, you will probably notice an issue with server-loaded pages other than the home page: When you refresh a secondary page, such as
/about, you will receive a 404 error message. This is because S3 is not able to serve files, other than/index.htmlwithout the.htmlextension. (It just so happens that the home page is most likely mapped toindex.html, so it works as expected.)To fix this issue, we need to export all of our pages as
index.html. So, for example, for the route/about, instead of generating it as the fileabout.html, we need to create it asabout/index.html. Fortunately, you can achieve this fairly easily by making a change to the NextJS config file atnext.config.js:module.exports = { reactStrictMode: true, trailingSlash: true, //<--add this here }One caveat with the above change is that all routes will have a trailing slash now. So, for example,
/aboutwill become/about/. (If trailing slashes are an issue, then you can research other (nastier) solutions.) -
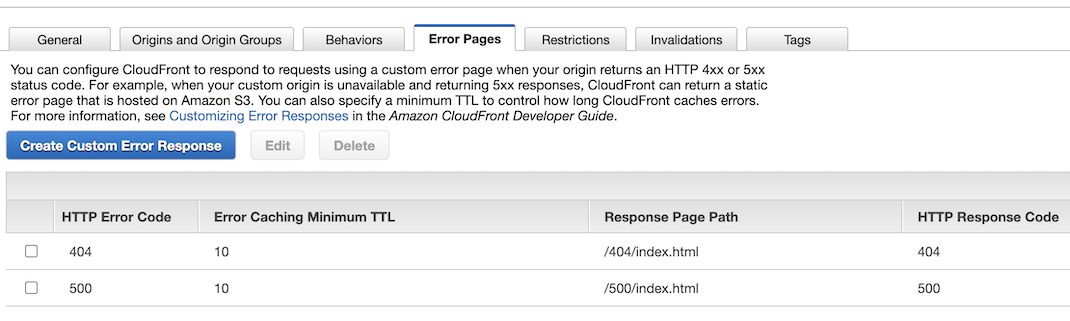
As for error pages, the second tutorial assumes you are deploying a normal client-rendered SPA. In the case of the NextJS site, you will need to configure CloudFront and S3 to map to custom error pages. If you remember from the NextJS docs, custom error pages can be created for common error codes. So, you can create a
500.jspage, mapping to500/index.htmlin the build, and a404.jspage, mapping to404/index.htmlin the build.For CloudFront, create the following entries in the Error Pages tab:
Continuous Integration & Continuous Deployment (CI/CD)
While I won't go into this topic in-depth, it is worth noting how you could incorporate deploy scripts added in the previous section into a CI/CD pipeline.
CircleCI is one of many excellent tools to achieve CI/CD. Below is an example CircleCI configuration file for the project you've built so far:
  version: 2.1
  commands:
    install-dependencies:
      steps:
        - restore_cache:
            keys:
              - dependencies-cache-rs-{{ checksum "./package-lock.json" }}
        - run: |
            npm install
        - save_cache:
            paths:
              - ./node_modules
            key: dependencies-cache-rs-{{ checksum "./package-lock.json" }}
  jobs:
    build:
      docker:
        - image: SOME_IMAGE
          auth:
            username: $DOCKERHUB_USERNAME
            password: $DOCKERHUB_PASSWORD

      steps:
        - checkout
        - install-dependencies
        - run:
            name: deploy
            command: npm run ${CIRCLE_BRANCH}deploy

  workflows:
    main-workflow:
      jobs:
        - build:
            context:
              - DOCKER
              - AWS_CI
            filters:
              branches:
                only:
                  - develop
                  - main
(As a best practice, additional steps, such as linting and tests, should also be added to the pipeline.)
Google Analytics
Unlike with old school server-rendered websites, Google Analytics "page views" in a SPA could happen either when a user navigates "pages" from the browser or when a page is served initially from the server/CDN. This makes incorporating Google Analytics into a typical SPA more complicated than just slapping in a script tag!
Luckily, there's a nifty package called react-ga that saves us a little work.
Below is a guide for incorporating Google Analytics into a NextJS site:
- Follow the first 3 steps from this tutorial to get Google Analytics set up if you don't have an account already.
- Run
npm install react-ga(or the yarn equivalent) -
Create a file under
pages/called_app.js, if you have not already. -
Add the following code to
_app.js:import { useEffect } from "react"; import { useRouter } from "next/router"; import ReactGA from "react-ga"; const initGA = () => { ReactGA.initialize("YOUR_GOOG_ANALYTICS_ID_HERE"); }; const logPageView = () => { const url = window.location.pathname + window.location.search; ReactGA.set({ page: window.location.pathname }); ReactGA.pageview(url); }; function MyApp({ Component, pageProps }) { const router = useRouter(); useEffect(() => { initGA(); //initialize analytics logPageView(); //track on the first load router.events.on("routeChangeComplete", logPageView); //track when navigation happens // If the component is unmounted, unsubscribe // from the event with the `off` method: return () => { router.events.off("routeChangeComplete", logPageView); }; }, [router.events]); return <Component {...pageProps} />; } export default MyApp;useEffecthook, the code above will initialize GA when the application first loads, log the pageView of the first page requested, and log the pageView for any user navigation changes after that. - To test out your changes locally, head over to the Google Analytics Dashboard again, and select Realtime->Overview. Then, click around on your different route links on your site. You should see the realtime section updating with some of the latest URLs you just visited.
Search Engine Optimization (SEO)
Since we have static HTML for all of our public-facing pages, most of the SEO work is already done! However, there are still a few optimizations that need custom dev work:
-
Title and Descriptions MetaTags: It's important to provide the proper values for these metatags. One option for feeding these values through is using a custom Layout component with props for the values:
import Head from "next/head"; const Layout = ({ children, metaTitle, metaDesc }) => ( <> <Head> <title>{metaTitle ? metaTitle : "SOME DEFAULT TITLE"}</title> {metaDesc && <meta name="description" content={metaDesc} />} {/*more meta tags...*/} </Head> <div className="container">{children}</div> </> ); export default Layout; -
Google Sitemap: Sitemaps are a key aspect in having solid SEO.
Typically developers generate sitemaps under the URL
/sitemap.xml. With NextJS, we can hook into the same static generation process to create this sitemap file and publish it to our CDN, as we do for other HTML pages. The steps to do this are below:-
We will be using a package called next-sitemap to handle much of the plumbing. Install the package by using
npm install next-sitemap(or the yarn equivalent) -
Create a file called
next-sitemap.jsat the root of your project. Then add the following code to it:module.exports = { siteUrl: process.env.SITE_URL || "https://YOUR_WEBSITE_DOMAN", outDir: "out", // ...other options }; -
Add the following post-build script to your
package.jsonfile:"postbuild": "next-sitemap"(Now, the sitemap script will get called after the build and export steps we visited before) -
Deploy the sitemap changes using the deployment scripts described
earlier in this post. Then, once deployed, test out the
URL
/sitemap.xml. If all works, you should see a bunch of XML with your links! -
Set up a property in
Google Search Console
and link it to your site. I chose to use a common layout file to add
the necessary verification code:
import Head from "next/head"; const Layout = ({ children, metaTitle, metaDesc }) => ( <> <Head> <meta name="google-site-verification" content="YOUR SITE VERIFICATION CODE" />{" "} {/*more meta tags...*/} </Head> <div className="container">{children}</div> </> ); export default Layout; - Deploy your changes. Then, submit your sitemap to Google Search Console: To submit, go to the "Sitemaps" section of GSC and follow the instructions to add a new sitemap.
-
Lighthouse Optimizations
Below are some dev tricks for getting a high score with Google Lighthouse:
-
Performance
-
Caching static resources via
Cache-Control( more here ): static assets like the js and CSS files we bundle with NextJS can be cached indefinitely on the client, since those resources are "cache busted", via a file-naming strategy, on every new build and deployment.The following is a solution for the S3 deployment laid out earlier. S3 expects the Cache-Control headers to be set when uploading the files. So, to expand on our deploy script created in that earlier section, follow these steps
-
Create a file called
deploy.shat the root of your project. -
If you are developing on Linux, add execute permissions to the file:
chmod +x deploy.sh -
Add the following code:
The above code first uploads the static files from the directories#!/bin/bash # copy _next/static and static folders, and make the files immutable aws s3 sync ./out/_next/static s3://YOUR_S3_DEPLOY_BUCKET_NAME/_next/static \ --cache-control immutable,max-age=100000000,public \ --delete aws s3 sync ./out/static s3://YOUR_S3_DEPLOY_BUCKET_NAME/static \ --cache-control immutable,max-age=100000000,public \ --delete #then do the rest aws s3 sync out/ s3://YOUR_S3_DEPLOY_BUCKET_NAME --deleteout/_next/staticandout/staticwith aCache-Controlheader that makes it cacheable forever in the browser. Then, after those 2 folders have been uploaded, it goes ahead and uploads the rest of the files. -
In
package.json, change your deploy script to reference the newdeploy.shfile:"deploy": "./deploy.sh", - Lazy load images ( more here): This one is easy :) Use the NextJS Image component!
-
Create a file called
-
-
Accessibility
-
Adding the
langattribute to yourhtmltag (more here): To make changes to thehtmltag in NextJS, you must create a custom document:-
If not already created, add a file called
_document.jsto thepages/directory -
Add the following code:
This code is mostly boilerplate for a custom document, with the addedimport Document, { Html, Head, Main, NextScript } from "next/document"; class MyDocument extends Document { static async getInitialProps(ctx) { const initialProps = await Document.getInitialProps(ctx); return { ...initialProps }; } render() { return ( <Html lang="en"> <Head /> <body> <Main /> <NextScript /> </body> </Html> ); } } export default MyDocument;langattribute on thehtmltag.
-
If not already created, add a file called
-
Adding the
-
Progressive Web App
- next-pwa provides a straightforward solution for turning your NextJS app into a PWA. I'll just defer to their docs.